LFCS #5:如何在 Linux 中挂载本地和网络(Samba 和 NFS)文件系统
Linux 基金会推出了 LFCS 认证(Linux 基金会认证系统管理员),这是一项全新的计划,其目的是让来自世界各地的个人获得 Linux 系统基础到中级系统管理任务的认证,包括支持正在运行的系统和服务,以及整体监控和分析,以及在向上级支持团队提出问题时做出明智的决策。
该系列标题为LFCS(Linux 基金会认证系统管理员)的准备第 1至33部分,涵盖以下主题:
这篇文章是 33 个教程系列的第 5 部分,在本部分中,我们将解释如何在 Linux 中挂载/卸载 LFCS 认证考试所需的本地和网络文件系统。
在 Linux 中挂载和卸载文件系统
一旦磁盘被分区,Linux 就需要某种方法来访问分区上的数据。与 DOS 或 Windows(通过为每个分区分配驱动器号来实现)不同,Linux 使用统一的目录树,每个分区都安装在该树的安装点上。
挂载点是用于访问分区上的文件系统的目录,挂载文件系统是将某个文件系统(例如,某个分区)与目录树中的特定目录关联的过程。
换句话说,管理存储设备的第一步是将设备附加到文件系统树。此任务可以通过使用mount等工具一次性完成(然后使用umount卸载),也可以通过编辑/etc/fstab文件在重新启动后持续完成。
在 Linux 中挂载文件系统
mount命令(不带任何选项或参数)显示当前已挂载的文件系统。
# mount

此外,mount用于将文件系统挂载到文件系统树中。其标准语法如下。
# mount -t type device dir -o options
此命令指示内核使用所有选项将在设备(例如,已使用文件系统类型格式化的分区)上找到的文件系统挂载到目录dir。在此形式中,mount 不会在/etc/fstab中查找指令。
例如,如果仅指定目录或设备。
# mount /dir -o options
or
# mount device -o options
mount命令尝试查找一个挂载点,如果找不到,则搜索设备(两种情况都在/etc/fstab文件中),最后尝试完成挂载操作(通常会成功,除非目录或设备已被使用,或者调用 mount 的用户不是 root)。
您会注意到,挂载输出中的每一行都具有以下格式。
device on directory type (options)
例如,
/dev/mapper/debian-home on /home type ext4 (rw,relatime,user_xattr,barrier=1,data=ordered)
阅读:
/ dev /mapper/debian-home安装在/home上,已格式化为 ext4,具有以下选项:rw、relatime、user_xattr、barrier=1、data=ordered
Mount 命令选项
最常用的mount命令选项包括。
- async:允许在正在安装的文件系统上进行异步 I/O 操作。
- auto:将文件系统标记为可以使用 mount 自动挂载,与noauto
-a相反。 - defaults:此选项是 async、auto、dev、exec、nouser、rw、suid 的别名。请注意,多个选项必须用逗号分隔,中间不能有空格。如果您在选项之间意外输入空格,挂载会将后续文本字符串解释为另一个参数。
- loop:将映像(例如 .iso 文件)挂载为循环设备。此选项可用于模拟光盘内容在光学介质读取器中的存在。
- noexec:阻止在特定文件系统上执行可执行文件。它与 exec 相反。
- nouser:阻止任何用户(root 除外)挂载和卸载文件系统。它与用户相反。
- remount:如果文件系统已经挂载,则再次挂载它。
- ro:将文件系统以只读方式挂载。
- rw:以读写功能挂载文件系统。
- relatime:仅当 atime 早于 mtime 时才更新文件的访问时间。
- user_xattr:允许用户设置和远程扩展文件系统属性。
使用 ro 和 noexec 选项挂载设备
# mount -t ext4 /dev/sdg1 /mnt -o ro,noexec
在这种情况下,我们可以看到,尝试将文件写入或运行位于我们的挂载点内的二进制文件会失败,并显示相应的错误消息。
# touch /mnt/myfile
# /mnt/bin/echo “Hi there”

使用默认选项安装设备
在以下场景中,我们将尝试使用与上一个示例相同的命令将文件写入我们新安装的设备并运行位于其文件系统树中的可执行文件。
# mount -t ext4 /dev/sdg1 /mnt -o defaults

在最后一种情况下,它运行完美。
在 Linux 中卸载文件系统
卸载设备(使用umount命令)意味着完成写入所有剩余的“传输中”数据,以便可以安全移除。请注意,如果您尝试移除已安装的设备而不先正确卸载它,则可能会损坏设备本身或导致数据丢失。
话虽如此,为了卸载设备,您必须“站在”其块设备描述符或挂载点之外。换句话说,您当前的工作目录必须是挂载点以外的其他目录。否则,您将收到一条消息,提示设备正忙。

“离开”挂载点的一个简单方法是输入cd命令,该命令缺少参数,将带我们进入当前用户的主目录,如上所示。
挂载 Samba 和 NFS 网络文件系统
最常用的两个网络文件系统是SMB(代表“服务器消息块”)和NFS(“网络文件系统”)。如果您只需要为类 Unix 客户端设置共享,则可能会使用NFS;如果您需要与基于 Windows 的客户端以及其他类 Unix 客户端共享文件,则可能会选择Samba 。
以下步骤假设已经在 IP 为192.168.0.10的服务器上设置了Samba和NFS共享(请注意,设置 NFS 共享是LFCE考试所需的能力之一,我们将在本系列之后介绍)。
在 Linux 上安装 Samba 共享
1.首先,在基于Red Hat和Debian 的发行版上安装 samba-client、samba-common 和 cifs-utils 包。
# yum update && yum install samba-client samba-common cifs-utils
# apt update && apt install samba-client samba-common cifs-utils
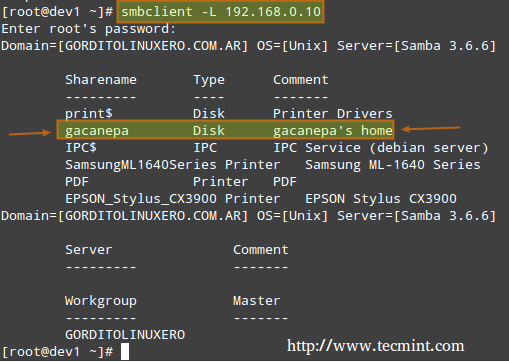
然后运行以下命令来查找服务器中可用的 samba 共享。
# smbclient -L 192.168.0.10
并输入远程机器的root账户的密码。

在上图中,我们突出显示了准备在本地系统上安装的共享。您需要在远程服务器上使用有效的 Samba 用户名和密码才能访问它。
2.当挂载受密码保护的网络共享时,最好不要将您的凭据写入/etc/fstab文件中。相反,您可以将它们存储在某个隐藏文件中,并将权限设置为600,如下所示。
# mkdir /media/samba
# echo “username=samba_username” > /media/samba/.smbcredentials
# echo “password=samba_password” >> /media/samba/.smbcredentials
# chmod 600 /media/samba/.smbcredentials
3.然后将以下行添加到/etc/fstab文件。
# //192.168.0.10/gacanepa /media/samba cifs credentials=/media/samba/.smbcredentials,defaults 0 0
4.您现在可以挂载您的 samba 共享,可以手动(mount //192.168.0.10/gacanepa)或通过重新启动机器来永久应用在/etc/fstab中所做的更改。
# mount -a

在 Linux 上挂载 NFS 共享
1.首先,在基于 Red Hat 和 Debian 的发行版上安装 nfs-common 和 portmap 包。
# yum update && yum install nfs-utils nfs-utils-lib
# apt update && apt install nfs-common
2.为 NFS 共享创建挂载点。
# mkdir /media/nfs
3.将以下行添加到/etc/fstab文件。
192.168.0.10:/NFS-SHARE /media/nfs nfs defaults 0 0
4. You can now mount your nfs share, either manually (mount 192.168.0.10:/NFS-SHARE) or by rebooting your machine so as to apply the changes made in /etc/fstab permanently.

Mounting Filesystems Permanently in Linux
As shown in the previous two examples, the /etc/fstab file controls how Linux provides access to disk partitions and removable media devices and consists of a series of lines that contain six fields each; the fields are separated by one or more spaces or tabs. A line that begins with a hash mark (#) is a comment and is ignored.
Each line has the following format.
<file system> <mount point> <type> <options> <dump> <pass>
Where:
- <file system>: The first column specifies the mount device. Most distributions now specify partitions by their labels or UUIDs. This practice can help reduce problems if partition numbers change.
- <mount point>: The second column specifies the mount point.
- <type>: The file system type code is the same as the type code used to mount a filesystem with the mount command. A file system type code of auto lets the kernel auto-detect the filesystem type, which can be a convenient option for removable media devices. Note that this option may not be available for all filesystems out there.
- <options>: One (or more) mount option(s).
- <dump>: You will most likely leave this to 0 (otherwise set it to 1) to disable the dump utility to backup the filesystem upon boot (The dump program was once a common backup tool, but it is much less popular today.)
- <pass>: This column specifies whether the integrity of the filesystem should be checked at boot time with fsck. A 0 means that fsck should not check a filesystem. The higher the number, the lowest the priority. Thus, the root partition will most likely have a value of 1, while all others that should be checked should have a value of 2.
Mount Examples
1. To mount a partition with the label Example at boot time with rw and noexec attributes, you should add the following line in /etc/fstab file.
LABEL=Example /mnt ext4 rw,noexec 0 0
2. If you want the contents of a disk in your DVD drive to be available at boot time.
/dev/sr0 /media/cdrom0 iso9660 ro,user,noauto 0 0
Where /dev/sr0 is your DVD drive.
Summary
You can rest assured that mounting and unmounting local and network filesystems from the command line will be part of your day-to-day responsibilities as a sysadmin. You will also need to master /etc/fstab.
I hope that you have found this article useful to help you with those tasks. Feel free to add your comments (or ask questions) below and share this article through your network social profiles.
LFCS 电子书现已开放购买。立即订购,开始成为认证 Linux 系统管理员的旅程!
| 产品名称 | 价格 | 买 |
|---|---|---|
| Linux 基金会的 LFCS 认证准备指南 | 19.99 美元 | [立即购买] |
最后,但同样重要的一点是,请考虑使用以下链接购买您的考试券,以赚取少量佣金,这将帮助我们保持本书的更新。
