如何监控 Apache Web 服务器负载和页面统计信息
在本文中,您将学习如何使用Linux 发行版(例如CentOS、RHEL和Fedora )中的mod_status模块监控Apache Web 服务器负载和请求。
什么是 mod_status?
mod_status是一个Apache模块,它通过可通过 Web 浏览器访问的HTML界面帮助监控 Web 服务器负载和当前 httpd 连接。
Apache 的mod_status显示一个纯 HTML 页面,其中包含有关 Web 服务器当前统计信息。
- 传入请求总数
- 字节总数和服务器计数
- Web服务器的CPU使用率
- 服务器负载
- 服务器正常运行时间
- 总流量
- 闲置工人总数
- 与各个客户端的 PID 等等。
Apache 项目默认向公众开放了其服务器统计页面。要查看繁忙网站状态页面的演示,请访问。
测试环境
在本文中,我们使用了以下测试环境,通过一些实际示例和屏幕截图进一步探索有关mod_status 的信息。
- 操作系统- CentOS 8/7
- 应用程序– Apache Web 服务器
- IP 地址– 5.175.142.66
- 文档根目录– /var/www/html
- Apache 配置文件– /etc/httpd/conf/httpd.conf
- 默认 HTTP 端口– 80 TCP
- 测试配置设置– httpd -t
本教程的先决条件是您应该已经知道如何安装和配置基本 Apache 服务器。如果您不知道如何设置 Apache,请阅读以下文章,它可能会帮助您设置自己的 Apache Web 服务器。
如何在 Apache 中启用 mod_status
Apache 默认安装时会启用mod_status。如果没有,请确保在 Apache 配置文件中启用它。
[root@example ~]# vi /etc/httpd/conf/httpd.conf
搜索单词“ mod_status ”或继续向下滚动直到找到包含以下内容的行。
#LoadModule status_module modules/mod_status.so
如果在“LoadModule”开头看到“# ”字符,则表示 mod_status 已禁用。删除“ # ”即可启用 mod_status。
LoadModule status_module modules/mod_status.so
配置 mod_status
现在再次搜索单词“ Location ”或向下滚动直到找到mod_status部分,其内容如下所示。
# Allow server status reports generated by mod_status,
# with the URL of http://servername/server-status
# Change the ".example.com" to match your domain to enable.
#
#<Location /server-status>
#    SetHandler server-status
#    Order deny,allow
#    Deny from all
#    Allow from .example.com
#</Location>
在以上部分中,根据需要取消注释Location 指令、SetHandler和目录限制的行。例如,我使用Order Allow、deny和 it's allowed for all 来保持简单。
<Location /server-status>
   SetHandler server-status
   Order allow,deny
   Deny from all
   Allow from all
</Location>
注意:以上配置是默认 Apache 网站(单个网站)的默认配置。如果您创建了一个或多个Apache 虚拟主机,则上述配置将不起作用。
因此,基本上,您需要为在 Apache 中配置的任何域的每个虚拟主机定义相同的配置。例如,mod_status 的虚拟主机配置将如下所示。
<VirtualHost *:80>
    ServerAdmin example@example.com
    DocumentRoot /var/www/html/example.com
    ServerName example.com
    ErrorLog logs/example.com-error_log
    CustomLog logs/example.com-access_log common
<Location /server-status>
   SetHandler server-status
   Order allow,deny
   Deny from all
   Allow from example.com
</Location>
</VirtualHost>
启用 ExtendedStatus
“ ExtendedStatus ” 设置向统计页面添加了更多信息,如CPU 使用率、每秒请求数、总流量等。要启用它,请编辑相同的httpd.conf文件并搜索单词“ Extended ”,取消注释该行并将ExtendedStatus指令的状态设置为“ On ” 。
# ExtendedStatus controls whether Apache will generate "full" status
# information (ExtendedStatus On) or just basic information (ExtendedStatus
# Off) when the "server-status" handler is called. The default is Off.
#
ExtendedStatus On
重启 Apache
现在请确保您已正确启用并配置了 Apache 服务器状态页面。您还可以使用以下命令检查httpd.conf配置中的错误。
[root@example ~]# httpd -t

Syntax OK
一旦确认语法正确,您就可以重新启动httpd服务。
[root@example ~]# service httpd restart
OR
[root@example ~]# systemctl restart httpd
Stopping httpd:                                          [  OK  ]
Starting httpd:                                          [  OK  ]
访问 mod_status 页面
您可以通过以下 URL 中的“ /server-status ”域名访问 Apache 状态页面。
http://serveripaddress/server-status

OR

http://serev-hostname/server-status
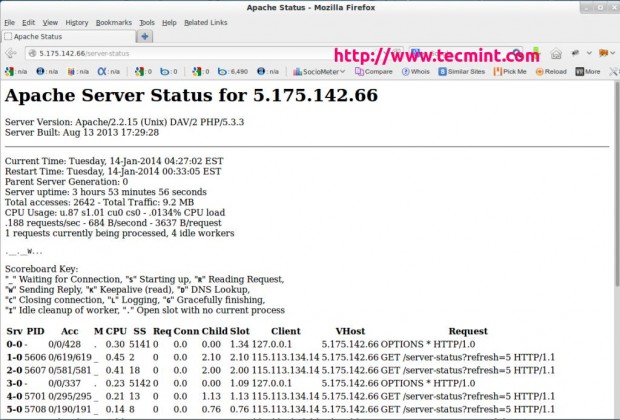
您将看到类似于以下启用了ExtendedStatus 的页面。

在上面的快照中,您可以看到一个HTML界面,它显示了有关服务器正常运行时间、各自客户端的进程 ID以及它们尝试访问的页面的所有信息。
它还显示了用于显示状态的所有缩写的含义和用法,这有助于我们更好地了解情况。
您还可以每隔几秒(例如5 秒)刷新一次页面,以查看更新的统计数据。要设置自动刷新,请在URL末尾添加“ ?refresh=N”。其中N可以替换为您希望页面刷新的秒数。
http://serveripaddress/server-status/?refresh=5

命令行状态页面视图
您还可以使用名为links 或 lynx 的特殊命令行浏览器从命令行界面查看 Apache 状态页面。您可以使用名为yum的默认包管理器实用程序安装它们,如下所示。
# yum install links

OR

# yum install lynx
安装后,您可以使用以下命令在终端上获取相同的统计数据。
[root@example ~]# links http://serveripaddress/server-status
OR
[root@example ~]# lynx http://serveripaddress/server-status
OR
[root@example ~]#  /etc/init.d/httpd fullstatus
示例输出
                     Apache Server Status for localhost
   Server Version: Apache/2.2.15 (Unix) DAV/2 PHP/5.3.3
   Server Built: Aug 13 2013 17:29:28

   --------------------------------------------------------------------------
   Current Time: Tuesday, 14-Jan-2014 04:34:13 EST
   Restart Time: Tuesday, 14-Jan-2014 00:33:05 EST
   Parent Server Generation: 0
   Server uptime: 4 hours 1 minute 7 seconds
   Total accesses: 2748 - Total Traffic: 9.6 MB
   CPU Usage: u.9 s1.06 cu0 cs0 - .0135% CPU load
   .19 requests/sec - 695 B/second - 3658 B/request
   1 requests currently being processed, 4 idle workers
 .__.__W...

   Scoreboard Key:
   "_" Waiting for Connection, "S" Starting up, "R" Reading Request,
   "W" Sending Reply, "K" Keepalive (read), "D" DNS Lookup,
   "C" Closing connection, "L" Logging, "G" Gracefully finishing,
   "I" Idle cleanup of a worker, "." Open slot with no current process

Srv PID     Acc    M CPU   SS  Req Conn Child Slot     Client        VHost             Request
0-0 -    0/0/428   . 0.30 5572 0   0.0  0.00  1.34 127.0.0.1      5.175.142.66 OPTIONS * HTTP/1.0
                                                                               GET
1-0 5606 0/639/639 _ 0.46 4    0   0.0  2.18  2.18 115.113.134.14 5.175.142.66 /server-status?refresh=5
                                                                               HTTP/1.1
                                                                               GET
2-0 5607 0/603/603 _ 0.43 0    0   0.0  2.09  2.09 115.113.134.14 5.175.142.66 /server-status?refresh=5
                                                                               HTTP/1.1
3-0 -    0/0/337   . 0.23 5573 0   0.0  0.00  1.09 127.0.0.1      5.175.142.66 OPTIONS * HTTP/1.0
                                                                               GET
4-0 5701 0/317/317 _ 0.23 9    0   0.0  1.21  1.21 115.113.134.14 5.175.142.66 /server-status?refresh=5
                                                                               HTTP/1.1
                                                                               GET
5-0 5708 0/212/213 _ 0.15 6    0   0.0  0.85  0.85 115.113.134.14 5.175.142.66 /server-status?refresh=5
                                                                               HTTP/1.1
6-0 5709 0/210/210 W 0.16 0    0   0.0  0.84  0.84 127.0.0.1      5.175.142.66 GET /server-status
                                                                               HTTP/1.1
7-0 -    0/0/1     . 0.00 5574 0   0.0  0.00  0.00 127.0.0.1      5.175.142.66 OPTIONS * HTTP/1.0

   --------------------------------------------------------------------------

    Srv  Child Server number - generation
    PID  OS process ID
    Acc  Number of accesses this connection / this child / this slot
     M   Mode of operation
    CPU  CPU usage, number of seconds
    SS   Seconds since the beginning of the most recent request
    Req  Milliseconds required to process most recent request
   Conn  Kilobytes transferred this connection
   Child Megabytes transferred this child
   Slot  Total megabytes transferred this slot
   --------------------------------------------------------------------------

    Apache/2.2.15 (CentOS) Server at localhost Port 80
结论
Apache 的mod_status模块是一个非常方便的监控工具,用于监控 Web 服务器活动的性能,并能够突出显示问题本身。有关更多信息,请阅读状态页面,它可以帮助您成为更成功的 Web 服务器管理员。
目前mod_status就这些了,我们将在以后的教程中提出更多有关 Apache 的技巧和窍门。在此之前,请继续保持 Geeky 并关注Example.com,别忘了添加您的宝贵意见。
