18 个 Apache Web 服务器安全和强化技巧
Apache Web 服务器是用于托管文件和网站的最流行和广泛使用的 Web 服务器之一。它易于安装和配置,可满足您的托管需求。但是,默认设置并不安全,无法为您的网站提供急需的保护。
在本指南中,我们将介绍一些您可以实施的 Apache 服务器强化技巧和窍门,以加强 Web 服务器的安全性。
1.如何隐藏 Apache 版本和操作系统信息
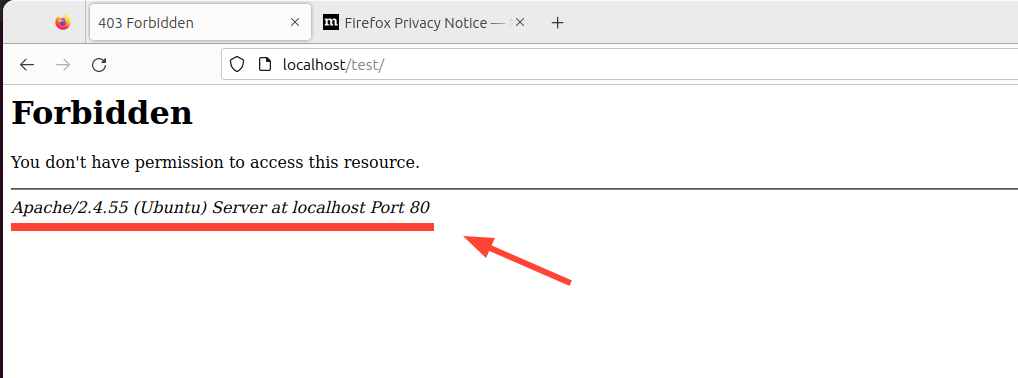
默认情况下,Apache Web 服务器会显示其版本,以防您浏览错误的网站 URL。下面是一个错误页面的示例,表明无法在网站上找到该页面。最后一行表示 Apache 版本、主机操作系统、IP 地址以及它正在监听的端口。

显示您的 Web 服务器信息永远不是个好主意,因为这可能为黑客的侦察任务提供一个很好的礼物。为了增加一层安全性并使黑客更难攻击,建议隐藏 Web 服务器信息。
为此,打开基于Debian 的发行版上的默认 Apache 配置文件。
$ sudo vim /etc/apache2/apache2.conf
对于基于 RHEL 的系统,例如RHEL、Fedora、CentOS、Rocky和AlmaLinux。
$ sudo vim /etc/httpd/conf/httpd.conf
在文件末尾添加以下行。
ServerTokens Prod
ServerSignature Off
保存更改并重新启动 Apache Web 服务器。
$ sudo systemctl restart apache2   [On Debian, Ubuntu and Mint]
$ sudo systemctl restart httpd     [On RHEL/CentOS/Fedora and Rocky/AlmaLinux]
现在重新加载网站,这一次,将不会显示 Web 服务器信息。

2. 禁用 Apache 中的目录列表
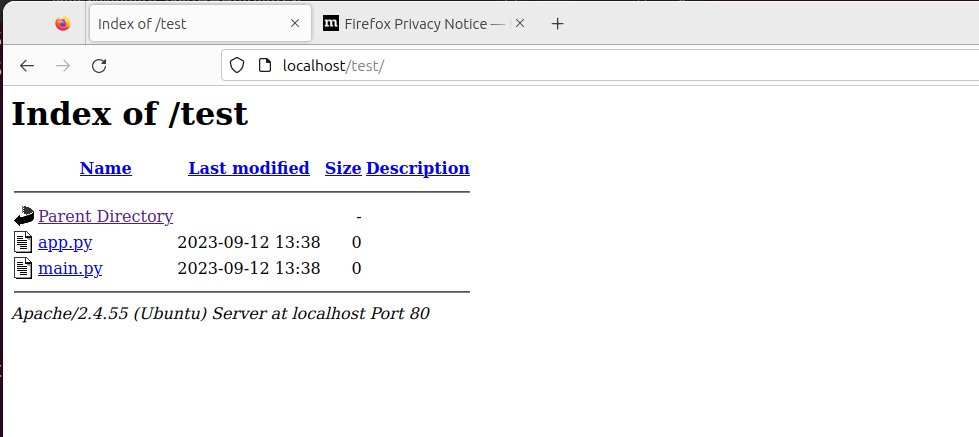
默认情况下,Apache允许目录列表,访问者可能会看到您文档根目录中的任何文件或目录。
为了演示这一点,我们将创建一个名为test的目录。
$ sudo mkdir -p /var/www/html/test
接下来,我们将导航到目录并创建一些文件。
$ cd /var/www/html/test
$ sudo touch app.py main.py
现在,如果我们访问该 URL,http://localhost/test我们将能够查看目录列表。

要禁用目录列表,请转到 Apache 的主配置文件并搜索“ Directory ”属性。将“ Options ”参数设置为'-Indexes'如下所示。
<Directory /opt/apache/htdocs>
Options -Indexes
</Directory>
重新加载Apache,这一次,当您访问该 URL 时,目录将不再显示。

3.定期更新Apache
始终建议保持所有应用程序为最新版本,因为最新的应用程序附带错误修复和安全补丁,可解决旧软件版本中存在的潜在漏洞。
因此,建议定期将您的应用程序升级到最新版本。
$ sudo apt update && sudo apt upgrade [On Debian, Ubuntu and Mint]
$ sudo dnf upgrade                    [On RHEL/CentOS/Fedora and Rocky/AlmaLinux]

4. 在 Apache 上使用 HTTPS 加密
Apache默认使用 HTTP 协议,这是一种脆弱且不安全的协议,容易被窃听。为了提高您网站的安全性,更重要的是提高您的 Google SEO 排名,请考虑使用 SSL 证书加密您的网站。
通过这样做,它将默认的 HTTP 协议切换为HTTPS,从而使任何人都更难拦截和破译从服务器来回发送的通信。
查看如何在 Linux 上使用Let's Encrypt SSL保护 Apache Web 服务器。
5. 为 Apache 启用 HTTP 严格传输安全 (HSTS)
除了使用TLS/SSL证书加密您的网站之外,还可以考虑在HTTPS之上实施HSTS网络安全机制。
HTTP 严格传输安全( HSTS ) 是一种保护网站免受中间人攻击和 cookie 劫持的策略机制。当攻击者将 HTTPS 协议降级为不安全的 HTTP 协议时,就会发生这种情况。
HSTS使 Web 服务器能够严格声明 Web 浏览器只能通过 HTTPS 与其交互,而不能通过 HTTP 协议与其交互。
要启用HSTS,请确保您的网站运行HTTPS并具有有效的TLS/SSL证书。
接下来,启用 Apache 的 headers 模块:
$ sudo a2enmod headers
然后重新加载Apache以应用更改。
$ sudo systemctl restart apache2
接下来,访问您的域的虚拟主机配置文件。
$ sudo vim /etc/apache2/sites-available/mydomain.conf
接下来,在块内添加此行<VirtualHost *:443>:
Header always set Strict-Transport-Security "max-age=31536000; includeSubDomains"
如下所示。
<VirtualHost *:443>
        # .....
        # ....
        Header always set Strict-Transport-Security "max-age=31536000; includeSubDomains"
</VirtualHost>
max-age参数指示 Web 浏览器在接下来的一年(31536000 = 1 年)内仅使用HTTPS访问您的网站。
最后,重新启动Apache以使HSTS策略生效。
$ sudo systemctl restart apache2
6. 在 Apache 上启用 HTTP/2
2015年,HTTP/2发布,这是HTTP协议的新版本,旨在解决HTTP/1.1的创建者未曾预见到的多个问题。
虽然HTTP/1.1仍然被广泛使用,但是它存在使用多个TCP连接来处理来自浏览器的多个请求的性能问题,这会导致客户端的资源开销过大,从而导致网络性能下降。
随着应用程序的复杂性和功能性不断增长,HTTP/2应运而生,以解决HTTP/1.1的缺点,包括 HTTP 标头长、网页加载速度慢以及整体性能下降。
HTTP/2比其前身提供了更多的保护和隐私。同样重要的是,通过使用多路复用数据流来增强性能。使用HTTP/2,即使在传输多个数据流时,单个 TCP 连接也能确保有效的带宽利用率。
查看如何使用以下命令在 Apache Web 服务器上启用 HTTP/2:
7.限制对 Apache 中敏感目录的访问
您可能采取的另一项安全措施是限制对可能包含敏感信息(例如用户数据、日志和配置文件)的目录的访问。
<VirtualHost *:80>
    ServerName example.com
    DocumentRoot /var/www/html

    # Other virtual host settings

    <Directory /var/www/html/sensitive_directory>
        Require all denied
    </Directory>
</VirtualHost>
在上面的配置中,Require all denied拒绝任何试图访问 / sensitive_directory中的文件的人访问。
保存更改并退出文件。然后重新启动 Apache 以使更改生效。
8. 在 Apache 中禁用 ServerSignature 指令
Apache 配置文件中的ServerSignature指令会将页脚附加到服务器生成的文档中,其中包含有关 Web 服务器配置的信息,例如版本和运行的操作系统。向恶意行为者泄露有关 Web 服务器的关键详细信息将大大增加遭受攻击的可能性。
为了防止此类信息泄露,您需要在 Apache 配置文件中禁用此指令:
ServerSignature Off
保存更改并再次重新启动Apache以使更改生效。
$ sudo systemctl restart apache2
9. 将 'ServerTokens' 指令设置为 'Prod'
' ServerTokens '指令控制服务器发送的信息,包括 Apache 版本(主版本和次版本)、操作系统和正在运行的 Web 服务器的类型。
您最不想向公众透露的信息是 Web 服务器是 Apache。其他任何信息都只会让您的服务器受到潜在攻击。因此,建议将Apache 配置文件中的“ ServerTokens ”指令设置为“ prod ”。
ServerTokens Off
像往常一样保存更改并确保重新启动 Apache。
10. 使用 Fail2ban 保护 Apache
Fail2ban是一款开源入侵防御应用程序,可保护 Linux 系统免受 DoS 和暴力攻击等外部威胁。它的工作原理是不断监控系统日志中的恶意活动并禁止与模仿攻击行为的模式相匹配的主机。
可以配置Fail2ban来保护 Apache 免受 DoS 攻击,方法是不断监视 Apache 日志中是否存在失败的登录尝试并暂时禁止违规 IP。
查看如何在 Linux 上安装Fail2ban:
11.禁用不必要的模块
Apache 模块只是为了扩展 Web 服务器的功能而加载的程序,模块扩展的功能包括基本身份验证、内容缓存、加密、安全等。
始终建议禁用所有当前未使用的模块,以最大限度地减少成为攻击受害者的机会。
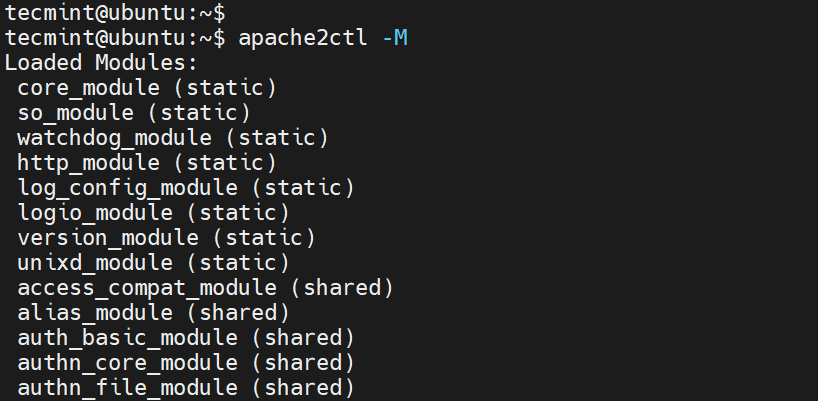
要查看所有启用的模块,请运行命令
$ apache2ctl -M

要检查特定模块是否启用,例如重写模块,请运行该命令。
$ apache2ctl -M | grep rewrite

要禁用该模块,请运行以下命令:
$ sudo a2dismod rewrite

12. 使用 mod_security 和 mod_evasive 模块保护 Apache
您可以启用mod_security和mod_evasive模块来保护 Apache 免受暴力攻击或 DDoS 攻击。
- mod_security模块的作用类似于 Web 应用程序防火墙 ( WAF ),可以阻止进入您网站的可疑和不需要的流量。
- mod_evasive模块保护您的服务器免受暴力破解和拒绝服务攻击 (DoS)。
阅读有关如何使用 mod_security 和 mod_evasive模块保护 Apache 的更多信息。
13. 限制 Apache 中不需要的服务
为了进一步保护Apache,请考虑禁用某些服务,例如符号链接和 CGI 执行(如果当前不需要)。默认情况下,Apache 遵循符号链接,我们可以-Includes在一行中关闭此功能以及该功能和 CGI。
为此,请在“目录”部分添加“选项”'-ExecCGI -FollowSymLinks -Includes'指令行。
<Directory /your/website/directory>
Options -ExecCGI -FollowSymLinks -Includes
</Directory>
这也可以在目录级别实现。例如,在这里,我们关闭“/var/www/html/mydomain1”目录的 Includes 和 Cgi 文件执行。
<Directory "/var/www/html/mydomain1">
	Options -Includes -ExecCGI
</Directory>
保存更改并重新启动 Apache。
14. 限制 Apache 中的文件上传大小
保护 Web 服务器的另一种方法是限制从客户端发送到 Web 服务器的 HTTP 请求主体的总大小。您可以在服务器、每个目录、每个文件或每个位置的上下文中设置它。
For instance, if you want to allow file upload to a specific directory, say /var/www/domain.com/wp-uploads directory, and restrict the size of the uploaded file to 4M = 4194304Bytes, add the following directive to your Apache configuration file or .htaccess file.
<Directory "/var/www/domain.com/wp-uploads">
	LimitRequestBody  4194304
</Directory>
Save the changes and remember to restart Apache.
You can set it in the context of server, per-directory, per-file, or per-location. The directive wards off abnormal client request behavior which sometimes can be a form of denial-of-service (DoS) attack.
15. Enable Logging in Apache
Logging provides all the details about client requests and any other information pertaining to the performance of your web server. This provides useful information in case something goes awry. Enabling Apache logs, especially in virtual host files allows you to pinpoint an issue in case something goes wrong with the web server.
To enable logging, you need to include the mod_log_config module, which provides two main logging directives.
- ErrorLog – Specifies the path of the error log file.
- CustomLog – Creates and formats a log file.
You can use these attributes in a virtual host file in the virtual host section to enable logging.
<VirtualHost 172.16.25.125:443>
        ServerName example.com
        DocumentRoot /var/www/html/example/
        ErrorLog ${APACHE_LOG_DIR}/error.log
        CustomLog ${APACHE_LOG_DIR}/access.log combined
</VirtualHost>
The {APACHE_LOG_DIR} directive in Debian systems is defined as /var/log/apache2 path.
16. Run Apache as a Separate User and Group
Running Apache as a separate user and group is a common security practice. By doing so, you can isolate the web server process from other system processes and minimize potential damage if the web server is compromised.
First, you’ll want to create a new user and group specifically for Apache.
$ sudo groupadd apachegroup
$ sudo useradd -g apachegroup apacheuser
Next, you’ll need to edit the Apache configuration file to specify the new user and group.
User apacheuser
Group apachegroup
Since you’re changing the user and group that Apache runs as you might need to update the ownership of web directories and files to ensure that Apache can still read them.
$ sudo chown -R apacheuser:apachegroup /var/www/html
After making these changes, restart Apache to apply them:
$ sudo systemctl restart httpd      # For RHEL/CentOS
$ sudo systemctl restart apache2    # For Debian/Ubuntu
17. Protect DDOS Attacks and Hardening
Well, it’s true that you can’t fully protect your website from DDoS attacks. However, here are some guidelines that can help you mitigate and manage them.
- TimeOut – This directive allows you to specify the duration the server will wait for certain events to complete before returning an error. The default value is 300 seconds. For sites susceptible to DDoS attacks, it’s advisable to keep this value low. However, the appropriate setting largely depends on the nature of requests your website receives. Note: A low timeout might cause issues with some CGI scripts.
- MaxClients – 此指令设置可同时服务的连接数限制。任何超出此限制的新连接都将排队。它在 Prefork和Worker MPM中都可用。默认值为256。
- KeepAliveTimeout – 此指令指定服务器在关闭连接之前等待后续请求的时间。默认值为 5 秒。
- LimitRequestFields – 此指令设置客户端接受的 HTTP 请求标头字段数量的限制。默认值为 100。如果由于 HTTP 请求标头数量过多而发生 DDoS 攻击,建议降低此值。
- LimitRequestFieldSize – 此指令为 HTTP 请求标头设置大小限制。
18. 定期执行漏洞扫描
保护 Web 服务器的另一种方法是定期进行漏洞扫描测试。这有助于识别黑客可能利用的潜在安全漏洞,从而获取敏感文件的访问权限或注入恶意软件。
漏洞扫描工具还可以帮助指出不安全的配置设置并帮助审核合规性。流行的漏洞扫描工具包括Acutenix、Nessus、Nexpose、Sucuri等。
结论
这些是一些 Apache 强化技巧,您可以在 Web 服务器上实施这些技巧,以提供额外的保护层并阻止入侵。
