如何在 Alpine Linux 上使用 Awall 设置防火墙
| 教程要求 | |
|---|---|
| 要求 | Alpine Linux |
| Root 权限 | 是的 |
| 难度等级 | 先进的 |
| 预计阅读时间 | 7 分钟 |
如何在 Alpine Linux 上安装 Awall
您需要使用apk 命令更新系统:
# apk update && apk upgrade

## Install both IPv4 and IPv6 version of IPtables ##

# apk add ip6tables iptables

## Install awall ##

# apk add -u awall

## Verify it ##

# apk version awall

了解 Awall 概念
Awall 配置从一个或多个名为策略文件的 JSON 格式文件开始。Alpine Linux 附带的强制策略位于 /usr/share/awall/mandatory 中,可使用 ls 命令/ cat 命令查看:
但是,开发人员和系统管理员需要在 /etc/awall 目录中安装特定于服务器的自定义策略:
每个 awall 策略可以包含以下内容的定义:
# ls -l /usr/share/awall/mandatory/

# more /usr/share/awall/mandatory/services.json

# cat /usr/share/awall/mandatory/defaults.json

# ls /etc/awall/
- 变量(例如 $interface_name)
- 区域(如互联网、局域网、红区、绿区、蓝区)——基于接口定义,并分配一个名称以用于您的策略。
- 接口(如 eth0)
- 策略——策略告诉 Awall 当数据包进入或离开某个区域(接口)时该做什么。
- 过滤器和 NAT 规则
- 服务(如 nginx 或 mysql)
让我们看看如何为专用虚拟机或裸机服务器配置 Awall,其中 eth0 连接到高速互联网,我们需要保护服务器。我们的目标是允许 ssh (22)、ping 和 HTTP (80) + HTTPS(仅限 4430 端口)。
步骤 1. 先决条件
首先,我们必须使用 modprobe 命令加载防火墙的 Linux 内核驱动程序(模块):
# modprobe -v ip_tables # IPv4

# modprobe -v ip6_tables # if IPv6 is used

# modprobe -v iptable_nat # if NAT is used aka router
insmod /lib/modules/5.4.43-1-virt/kernel/net/netfilter/x_tables.ko
insmod /lib/modules/5.4.43-1-virt/kernel/net/ipv4/netfilter/ip_tables.ko ip6_tables
请注意,上述命令仅在第一次安装 awall 后才需要。接下来,使防火墙在启动时自动启动并自动加载所需的 Linux 内核模块:
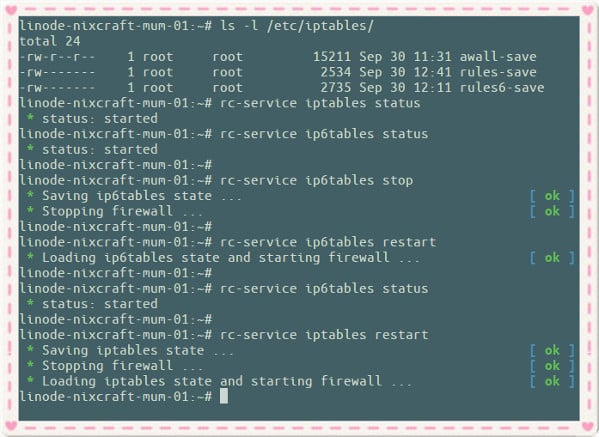
请注意,Awall 是一个创建规则的前端工具。所有防火墙规则都存储在 /etc/iptables/ 目录中。可以使用以下命令随时停止或重新启动防火墙服务:
# rc-update add iptables

 * service ip6tables added to runlevel default

# rc-update add ip6tables

 * service ip6tables added to runlevel default
# ls -l /etc/iptables/

# cat /etc/iptables/rules-save

# rc-service iptables {start|stop|restart|status}

# rc-service ip6tables {start|stop|restart|status}

Alpine Linux 命令控制 iptables 防火墙
步骤 2. 使用 Awall 设置防火墙来保护 Alpine Linux 机箱
使用文本编辑器创建一个名为 cloud-server.json 的新文件,如下所示,删除所有传入和传出流量。这是我用于保护托管在Linode上的云服务器的示例文件:
# cat /etc/awall/optional/cloud-server.json
{
  "description": "Default awall policy to protect Cloud server",

  "variable": { "internet_if": "eth0" },

  "zone": {
    "internet": { "iface": "$internet_if" }
  },

  "policy": [
    { "in": "internet", "action": "drop" },
    { "action": "reject" }
  ]

}
接下来打开 TCP 端口 22。换句话说,允许以最大 ssh 登录速率限制进行传入 SSH 访问,以避免攻击者/机器人暴力破解我们的 Alpine 云服务器:
# cat /etc/awall/optional/ssh.json
{

    "description": "Allow incoming SSH access (TCP/22)",

    "filter": [
        {
            "in": "internet",
            "out": "_fw",
            "service": "ssh",
            "action": "accept",
	    "conn-limit": { "count": 3, "interval": 60 }
        }
    ]
}
在哪里,
- "in": "internet",:互联网是我们的默认区域,我们正在创建传入策略以打开 TCP 端口 22。
- "out": "_fw",:AWall 有一个名为“_fw”的内置区域,即“防火墙本身”。
- "service": "ssh",:打开SSH端口22。
- "action": "accept",:接受数据包。
- "conn-limit": { "count": 3, "interval": 60 }:限制 ssh 连接的速率。
关于限制来自特定 IP 地址或子网/网络 (CIDR) 的 ssh 流量的说明
使用以下"src": "1.2.3.4",选项更新你的 ssh.json:
{
    "description": "Allow incoming SSH access (TCP/22) only from our office VPN at 1.2.3.4",
    "filter": [
        {
            "in": "internet",
            "out": "_fw",
            "service": "ssh",
            "action": "accept",
            "src": "1.2.3.4",
	    "conn-limit": { "count": 3, "interval": 60 }
        }
    ]
}
对于多个 IP/CIDR,请尝试如下操作:
"src": [ "1.2.3.4", "192.168.2.0/24", "202.54.5.1" ],
做一个好的网民,允许对我们的服务器进行 ping/ICMP 请求并应用速率限制:
# cat /etc/awall/optional/ping.json
{

    "description": "Allow ping-pong",

    "filter": [
        {
	      "in": "internet",
	      "service": "ping",
	      "action": "accept",
 	      "flow-limit": { "count": 10, "interval": 6 }
        }
    ]
}
最后允许 HTTP/HTTPS、DNS、ping、ssh、DNS 和 NTP 协议的选定传出连接:
# cat /etc/awall/optional/outgoing.json
{

    "description": "Allow outgoing connections for dns, http/https, ssh, ntp, ssh and ping",

    "filter": [
    	{
            "in": "_fw",
            "out": "internet",
            "service": [ "dns", "http", "https", "ssh", "ntp", "ping" ],
            "action": "accept"
	}
    ]
}
步骤 3. 列出 Awall 可用策略
运行:
# awall list
输出:
cloud-server  disabled  Default awall policy to protect Cloud server
outgoing      disabled  Allow outgoing connections for dns, http/https, ssh, ntp, ssh and ping
ping          disabled  Allow ping-pong
ssh           disabled  Allow incoming SSH access (TCP/22)
步骤 4. 启用 Awall 防火墙策略
再次运行:
# awall enable cloud-server

# awall enable ssh

# awall enable ping

# awall enable outgoing
步骤 5. 启动防火墙
最后,我们需要从策略文件创建防火墙配置并启用它。换句话说,以下命令将启动防火墙并加载所有规则:
# awall activate
系统将提示您按下RETURN以下键:
New firewall configuration activated
Press RETURN to commit changes permanently:
注意:启用或禁用策略后,您始终需要运行awall activate命令来更新 iptables 规则。
步骤 6. 打开传入 HTTP 和 HTTPS 端口
创建一个名为 apache.json 的新策略文件,如下所示:
# vi /etc/awall/optional/apache.json
{
    "description": "Allow incoming Apache HTTP/HTTPS (TCP/80 and 443) ports",
    "filter": [
        {
            "in": "internet",
            "out": "_fw",
            "service": [ "http", "https"],
            "action": "accept"
        }
    ]
}保存并关闭文件。接下来激活新的防火墙策略规则:
# awall enable apache

# awall activate
步骤 7. 关闭端口或禁用现有策略
假设您有一个名为 openvpn.json 的策略,并且您不再使用 OpenVPN 服务器。我们可以通过禁用该策略来关闭 UDP/1194 端口,如下所示:
# awall list

# awall disable openvpn

# awall activate
步骤8.查看iptables规则
您可以使用以下命令列出所有 iptables 规则:
想要查看丢弃的数据包日志?尝试 dmesg 命令和grep 命令:
# iptables -L -n -v | more

# ip6tables -L -n -v | more

# ip6tables -S

# iptables -S

# dmesg

## See dropped packets from SSH port ##

# dmesg | grep -w DPT=22
[ 3532.077008] IN=eth0 OUT= MAC=f2:3c:92:64:16:11:aa:01:9d:43:81:e6:08:00 SRC=194.180.224.130 DST=172.105.xx.yy LEN=60 TOS=0x00 PREC=0x20 TTL=49 ID=9647 DF PROTO=TCP SPT=33106 DPT=22 WINDOW=29200 RES=0x00 SYN URGP=0
[ 3532.077347] IN=eth0 OUT= MAC=f2:3c:92:64:16:11:aa:01:9d:43:81:e6:08:00 SRC=194.180.224.130 DST=172.105.xx.yy LEN=60 TOS=0x00 PREC=0x20 TTL=50 ID=35762 DF PROTO=TCP SPT=33110 DPT=22 WINDOW=29200 RES=0x00 SYN URGP=0
[ 3533.078293] IN=eth0 OUT= MAC=f2:3c:92:64:16:11:aa:01:9d:43:81:e6:08:00 SRC=194.180.224.130 DST=172.105.xx.yy LEN=60 TOS=0x00 PREC=0x20 TTL=50 ID=35763 DF PROTO=TCP SPT=33110 DPT=22 WINDOW=29200 RES=0x00 SYN URGP=0
步骤 9. 禁用并重置 Awall
由于某种原因您不再想使用防火墙和 Awall,您可以使用以下命令禁用它:
# rc-service iptables stop

# rc-service ip6tables stop
 * Saving ip6tables state ...                        [ ok ]
 * Stopping firewall ...                             [ ok ]
现在列出并禁用所有策略:
最后使用 rc-update 命令禁用 Alpine Linux 机器上的 iptables 防火墙服务:
# awall list

# awall disable cloud-server

# awall disable ssh

# awall disable ping

# awall disable outgoing
# rc-update del ip6tables

# rc-update del iptables
* service iptables removed from runlevel default
结论
在本快速教程中,我们了解了 Awall,并设置了默认防火墙策略,该策略会丢弃 Alpine Linux 上的所有传入和传出连接。接下来,我们根据需要打开所需的端口。尝试 awall help,如下所示:
# awall help
有关更多信息,请参阅以下资源:
