如何在 Ubuntu 20.04 上安装 EteSync 服务器
在此页
- 先决条件
- 开始
- 安装 MariaDB 服务器
- 安装和配置 EteSync
- 为 EteSync 创建系统单元文件
- 将 Apache 配置为反向代理
- 访问 EteSync 管理控制台
- 使用 Lets Encrypt SSL 保护 EteSync
- 结论
EteSync 是一个开源解决方案,用于同步您的联系人、日历和任务。它是自托管的,提供端到端加密,并允许您与其他用户共享数据。它可以与 GNOME 和 KDE 桌面集成。可以通过桌面、Web、Android 和 iOS 客户端访问它。
在本教程中,我将向您展示如何在 Ubuntu 20.04 上使用 Apache 安装 EteSync。
先决条件
- 一台运行 Ubuntu 20.04 的服务器。
- 用您的服务器 IP 指向的有效域名。
- 在服务器上配置了根密码。
入门
首先,通过运行以下命令将系统包更新到更新版本:
apt-get update -y更新所有包后,您可以继续下一步。
安装 MariaDB 服务器
默认情况下,EteSync 使用 SQLite 数据库来存储其信息。在这里,我们将安装并使用 MariaDB 作为数据库后端。
首先,使用以下命令安装所需的依赖项:
apt-get install software-properties-common gnupg2 -y接下来,使用以下命令添加 MariaDB GPG 密钥和存储库:
apt-key adv --recv-keys --keyserver hkp://keyserver.ubuntu.com:80 0xF1656F24C74CD1D8
add-apt-repository 'deb [arch=amd64,arm64,ppc64el] http://mirror.lstn.net/mariadb/repo/10.5/ubuntu focal main'
接下来,更新 MariaDB 存储库并使用以下命令安装最新版本的 MariaDB:
apt-get install mariadb-server -y安装 MariaDB 服务器后,使用以下命令登录 MariaDB shell:
mysql登录后,使用以下命令为 EteSync 创建数据库和用户:
MariaDB [(none)]> create database etesync;
MariaDB [(none)]> create user  identified by 'securepassword';
接下来,使用以下命令授予 EteSync 数据库的所有权限:
MariaDB [(none)]> grant all privileges on etesync.* to ;接下来,使用以下命令刷新权限并退出 MariaDB:
MariaDB [(none)]> flush privileges;
MariaDB [(none)]> exit;
完成后,您可以继续下一步。
安装和配置 EteSync
首先,您需要安装 EteSync 所需的一些 Python 依赖项。您可以使用以下命令安装所有这些:
apt-get install python3-virtualenv python3-pip gcc libmysqlclient-dev build-essential git -y安装所有依赖项后,使用以下命令下载最新版本的 EteSync:
git clone https://github.com/etesync/server.git etesync下载完成后,将目录更改为 etesync 并使用以下命令创建 Python 虚拟环境:
cd etesync
virtualenv -p python3 .venv
接下来,使用以下命令激活虚拟环境:
source .venv/bin/activate接下来,使用以下命令安装所有要求:
pip install -r requirements.txt接下来,复制示例配置文件:
cp etebase-server.ini.example etebase-server.ini接下来,使用以下命令编辑配置文件:
nano etebase-server.ini根据您的配置添加或修改以下行:
media_root = /opt
allowed_host1 = etesync.example.com

;engine = django.db.backends.sqlite3
;name = db.sqlite3

engine = django.db.backends.mysql
name = etesync
user = etesync
password = securepassword
host = 127.0.0.1
port = 3306
保存并关闭文件,然后使用以下命令安装其他模块:
pip3 install daphne
pip3 install mysqlclient
pip3 install aioredis
接下来,生成静态文件并使用以下命令迁移数据库:
./manage.py collectstatic
./manage.py migrate
最后,使用以下命令启动 EteSync 服务器:
daphne -b 0.0.0.0 -p 8001 etebase_server.asgi:application如果一切正常,您应该得到以下输出:
2021-07-09 05:42:28,510 INFO     Starting server at tcp:port=8001:interface=0.0.0.0
2021-07-09 05:42:28,510 INFO     HTTP/2 support not enabled (install the http2 and tls Twisted extras)
2021-07-09 05:42:28,511 INFO     Configuring endpoint tcp:port=8001:interface=0.0.0.0
2021-07-09 05:42:28,512 INFO     Listening on TCP address 0.0.0.0:8001
按 CTRL + C 停止服务器。
接下来,使用以下命令创建管理用户:
./manage.py createsuperuser提供您的用户名、密码和电子邮件,如下所示:
Username: etesync
Email address:
Password:
Password (again):
Superuser created successfully.
接下来,使用以下命令从 Python 虚拟环境中停用:
deactivate为 EteSync 创建系统单位文件
接下来,您需要创建一个用于管理 EteSync 的 systemd 单元文件。您可以使用以下命令创建它:
nano /etc/systemd/system/etesync.service添加以下行:
[Unit]
Description=EteSync: End-to-End Encryption to Sync Calender, Contacts, Tasks and Notes.

[Service]
WorkingDirectory=/root/etesync
ExecStart=/root/etesync/.venv/bin/daphne -b 127.0.0.1 -p 8001 -u /tmp/etebase_server.sock etebase_server.asgi:application
User=root
Group=root
Restart=always
RestartSec=5s

[Install]
WantedBy=multi-user.target
保存并关闭文件,然后重新加载 systemd 守护进程以应用配置更改:
systemctl daemon-reload接下来,使用以下命令启动并启用 EteSync 服务:
systemctl start etesync
systemctl enable etesync
要验证 EteSync 服务的状态,请运行以下命令:
systemctl status etesync您将获得以下输出:
? etesync.service - EteSync: End-to-End Encryption to Sync Calender, Contacts, Tasks and Notes.
     Loaded: loaded (/etc/systemd/system/etesync.service; disabled; vendor preset: enabled)
     Active: active (running) since Fri 2021-07-09 05:45:45 UTC; 5s ago
   Main PID: 16213 (daphne)
      Tasks: 1 (limit: 2353)
     Memory: 48.7M
     CGroup: /system.slice/etesync.service
             ??16213 /root/etesync/.venv/bin/python /root/etesync/.venv/bin/daphne -b 127.0.0.1 -p 8001 -u /tmp/etebase_server.sock etebase_se>

Jul 09 05:45:45 node1 systemd[1]: Started EteSync: End-to-End Encryption to Sync Calender, Contacts, Tasks and Notes..
Jul 09 05:45:46 node1 daphne[16213]: 2021-07-09 05:45:46,993 INFO     Starting server at tcp:port=8001:interface=127.0.0.1, unix:/tmp/etebase_>
Jul 09 05:45:46 node1 daphne[16213]: 2021-07-09 05:45:46,995 INFO     HTTP/2 support not enabled (install the http2 and tls Twisted extras)
Jul 09 05:45:46 node1 daphne[16213]: 2021-07-09 05:45:46,995 INFO     Configuring endpoint tcp:port=8001:interface=127.0.0.1
Jul 09 05:45:46 node1 daphne[16213]: 2021-07-09 05:45:46,997 INFO     Listening on TCP address 127.0.0.1:8001
Jul 09 05:45:46 node1 daphne[16213]: 2021-07-09 05:45:46,998 INFO     Configuring endpoint unix:/tmp/etebase_server.sock
此时,EteSync 已启动并侦听端口 8001。您现在可以继续下一步。
将 Apache 配置为反向代理
还建议安装并使用 Apache 作为反向代理来访问 EteSync。首先,使用以下命令安装 Apache 服务器:
apt-get install apache2 -y安装 Apache 服务器后,使用以下命令启用所有代理模块:
a2enmod proxy proxy_http headers proxy_wstunnel接下来,创建一个新的 Apache 虚拟主机配置文件:
nano /etc/apache2/sites-available/etesync.conf添加以下行:
<VirtualHost *:80>
   ServerName etesync.example.com
   ErrorDocument 404 /404.html

   ErrorLog ${APACHE_LOG_DIR}/etebase_error.log
   CustomLog ${APACHE_LOG_DIR}/etebase_access.log combined

   ProxyPreserveHost On
   ProxyPass / http://127.0.0.1:8001/
   ProxyPassReverse / http://127.0.0.1:8001/
   Alias /static /etesync/static

</VirtualHost>
保存并关闭文件,然后使用以下命令激活 Apache 虚拟主机:
a2ensite etesync.conf接下来,重新启动 Apache 以更新更改:
systemctl restart apache2您现在可以使用以下命令验证 Apache 状态:
systemctl status apache2您应该得到以下输出:
? apache2.service - The Apache HTTP Server
     Loaded: loaded (/lib/systemd/system/apache2.service; enabled; vendor preset: enabled)
     Active: active (running) since Fri 2021-07-09 05:50:26 UTC; 5s ago
       Docs: https://httpd.apache.org/docs/2.4/
    Process: 17551 ExecStart=/usr/sbin/apachectl start (code=exited, status=0/SUCCESS)
   Main PID: 17567 (apache2)
      Tasks: 55 (limit: 2353)
     Memory: 5.3M
     CGroup: /system.slice/apache2.service
             ??17567 /usr/sbin/apache2 -k start
             ??17568 /usr/sbin/apache2 -k start
             ??17569 /usr/sbin/apache2 -k start

Jul 09 05:50:26 node1 systemd[1]: Starting The Apache HTTP Server...
Jul 09 05:50:26 node1 apachectl[17558]: AH00558: apache2: Could not reliably determine the server's fully qualified domain name, using 45.58.3>
访问 EteSync 管理控制台
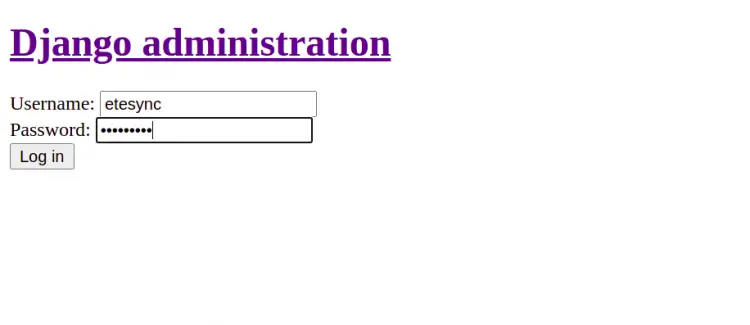
现在,打开您的网络浏览器并使用 URL http://etesync.example.com/admin/ 访问 EteSync 管理界面。您将被重定向到以下页面:

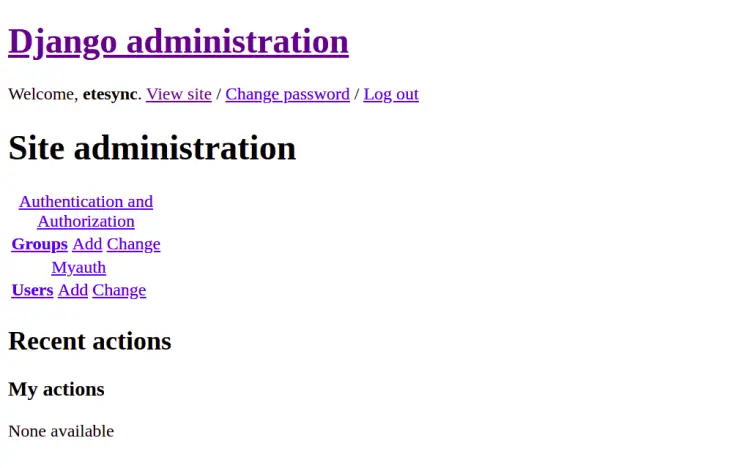
提供您的管理员用户名和密码,然后单击“登录”按钮。您应该会看到以下页面:

使用 Lets Encrypt SSL 保护 EteSync
首先,您需要安装 Certbot Lets Encrypt 客户端来为您的域下载和安装 SSL 证书。
您可以使用以下命令安装它:
apt-get install python3-certbot-apache -y安装后,您可以运行以下命令为您的域 etesync.example.com 安装 Lets Encrypt 证书。
certbot --apache -d etesync.example.com在安装过程中,您将被要求提供您的电子邮件地址并接受服务条款,如下所示:
Saving debug log to /var/log/letsencrypt/letsencrypt.log
Plugins selected: Authenticator apache, Installer apache
Enter email address (used for urgent renewal and security notices) (Enter 'c' to
cancel):

- - - - - - - - - - - - - - - - - - - - - - - - - - - - - - - - - - - - - - - -
Please read the Terms of Service at
https://letsencrypt.org/documents/LE-SA-v1.2-November-15-2017.pdf. You must
agree in order to register with the ACME server at
https://acme-v02.api.letsencrypt.org/directory
- - - - - - - - - - - - - - - - - - - - - - - - - - - - - - - - - - - - - - - -
(A)gree/(C)ancel: A

- - - - - - - - - - - - - - - - - - - - - - - - - - - - - - - - - - - - - - - -
Would you be willing to share your email address with the Electronic Frontier
Foundation, a founding partner of the Let's Encrypt project and the non-profit
organization that develops Certbot? We'd like to send you email about our work
encrypting the web, EFF news, campaigns, and ways to support digital freedom.

- - - - - - - - - - - - - - - - - - - - - - - - - - - - - - - - - - - - - - - -
(Y)es/(N)o: Y
Obtaining a new certificate
Performing the following challenges:
http-01 challenge for etesync.example.com
Enabled Apache rewrite module
Waiting for verification...
Cleaning up challenges
Created an SSL vhost at /etc/apache2/sites-available/etesync-le-ssl.conf
Deploying Certificate to VirtualHost /etc/apache2/sites-available/etesync-le-ssl.conf
Enabling available site: /etc/apache2/sites-available/etesync-le-ssl.conf

Please choose whether or not to redirect HTTP traffic to HTTPS, removing HTTP access.
- - - - - - - - - - - - - - - - - - - - - - - - - - - - - - - - - - - - - - - -
1: No redirect - Make no further changes to the webserver configuration.
2: Redirect - Make all requests redirect to secure HTTPS access. Choose this for
new sites, or if you're confident your site works on HTTPS. You can undo this
change by editing your web server's configuration.
- - - - - - - - - - - - - - - - - - - - - - - - - - - - - - - - - - - - - - - -
Select the appropriate number [1-2] then [enter] (press 'c' to cancel): 2
接下来,键入 2 并按 Enter 键为您的域下载并安装免费的 SSL 证书。安装成功完成后。您应该得到以下输出:
Enabled Apache rewrite module
Redirecting vhost in /etc/apache2/sites-enabled/etesync.conf to ssl vhost in /etc/apache2/sites-available/
etesync-le-ssl.conf

- - - - - - - - - - - - - - - - - - - - - - - - - - - - - - - - - - - - - - - -
Congratulations! You have successfully enabled https://etesync.example.com

You should test your configuration at:
https://www.ssllabs.com/ssltest/analyze.html?d=etesync.example.com
- - - - - - - - - - - - - - - - - - - - - - - - - - - - - - - - - - - - - - - -
结论
恭喜!您已经使用 Lets Encrypt SSL 在 Ubuntu 20.04 服务器上成功安装了 EteSync。您现在可以使用 EteSync 轻松同步您的日历和联系人。

